I am sure many of you might have come across the term "Hello, World" many times. The term Hello World, as Wikipedia says " is used to illustrate the most basic syntax of a programming language ".
In this post, we explore the basic syntax of Windows Phone 7 and make our very first Windows Phone 7 App. Let's get started right away
1 : Open Microsoft Visual Studio 2010 or Microsoft Visual Studio 2010 Express for Windows Phone.
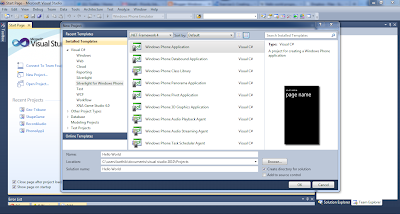
2 : Go to File > Project > Silverlight for Windows Phone. You can see all the installed templates for Windows Phone 7 here. Select Windows Phone Application template - Choose location and name the project and Click Ok.

3 : As soon as the project loads , you will see the Solution Explorer loaded with some files. Let us take a quick look at what these files do
Properties > AppManifest.xml : This manifest file is used to generate the application package
Properties > Assemblyinfo.cs : This file contains the data about name and version of the assembly
Properties > WMAppManifest.xml : Like the AppManifest file, WMAppManifest file includes metadata about Windows Phone application - specifically Silverlight for Windows Phone 7 application
References : This folder consists of libraries and services that are sometimes embedded in the application.
App.xaml > App.xaml.cs : The App.xaml file has code written in the XAML language. It is used to create UI elements . With the help of code-behind files ( App.xaml.cs ) the UI elements are connected to the code. This is the code that runs when the app is initialized.
ApplicationIcon.png : As the name suggests , this image represents the application in the phone application list
Background.png : This is a slightly bigger image than ApplicationIcon and shows up in the Start Screen
SplashScreenImage.jpg : When you launch the application , this image gives an impression that the app is being launched. It is a good practice to design this page according to the first page of your application so that it looks like your application has loaded successfully.
MainPage.xml > MainPage.xml.cs : It is a page which has a UI and the corresponding code stored in MainPage.xml.cs.
4 : We will now explore the App.xaml file . Open App.xaml by double clicking on it . You will see the XAML code. The is the root element . You can also see the < Application Resources > which can be used to set application level resources which in turn will be used throughout the application.
As mentioned earlier - App.xaml is the entry point of an application. This means when the application is launched - App.xaml is executed first.
Now right click on App.xaml and click on "View Code". The code behind file opens up and you can see the event handlers.
Exploring the IDE a bit more :
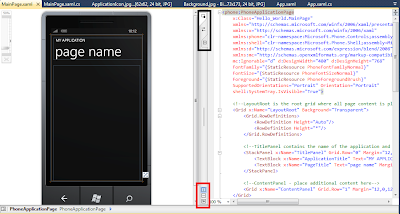
When you click on the MainPage.xaml , you will see the XAML Designer open up . You can see the code to the right of the designer and the Windows Phone 7 UI on the left . Using the buttons ( marked in red and black ) - you can switch between XAML Code and the Designer Mode

Jet , Set and Code !
1) Go the MainPage.xaml and look out for the following line of code

This is the code for the text blocks. Change the "My Application" and "page name" in the xaml code ( Note : This can also be changed by choosing the Text Blocks and changing the Text property from the Properties window )
Switch to Design mode and you will now see the updated text.
2) Let's now shift our focus to the toolbox ( usually on the left of the Visual Studio - If not present , Click on View > Toolbox )
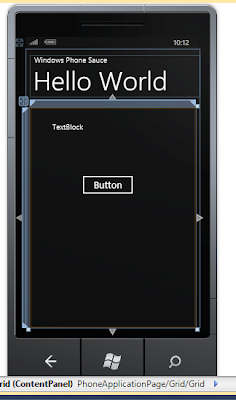
Drag and Drop "TextBlock" Control onto the design surface. Now drag and drop a "Button" Control.
The Design surface will now look something like this

3) We are almost there ! After you have designed the UI - you need to write the code to perform some action.
Select the Button - Go to the Properties toolbar and click on Events and Click on the dropdown button besides "Click" .
You will see immediately the code behind file opens up and the cursor lands between the button click event. Type the following code
Note : Another easy way to do this would be to double click on the button which would create the Button Click event.

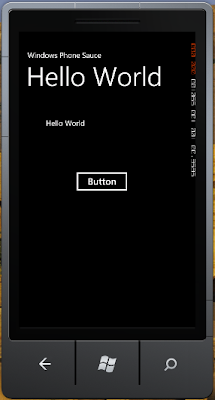
Here we have instructed the textblock to display "Hello World" when the button click happens.
( Note : We have used the default names for textblock and button , but it is advised to change them to something more sensible )
Go ahead and click on the Start Debugging ( or Press F5 ) . The Windows Phone 7 Emulator will load your app.


Congratulations ! You have just designed your first Windows Phone 7 app
In this post, we explore the basic syntax of Windows Phone 7 and make our very first Windows Phone 7 App. Let's get started right away
1 : Open Microsoft Visual Studio 2010 or Microsoft Visual Studio 2010 Express for Windows Phone.
2 : Go to File > Project > Silverlight for Windows Phone. You can see all the installed templates for Windows Phone 7 here. Select Windows Phone Application template - Choose location and name the project and Click Ok.

3 : As soon as the project loads , you will see the Solution Explorer loaded with some files. Let us take a quick look at what these files do
Properties > AppManifest.xml : This manifest file is used to generate the application package
Properties > Assemblyinfo.cs : This file contains the data about name and version of the assembly
Properties > WMAppManifest.xml : Like the AppManifest file, WMAppManifest file includes metadata about Windows Phone application - specifically Silverlight for Windows Phone 7 application
References : This folder consists of libraries and services that are sometimes embedded in the application.
App.xaml > App.xaml.cs : The App.xaml file has code written in the XAML language. It is used to create UI elements . With the help of code-behind files ( App.xaml.cs ) the UI elements are connected to the code. This is the code that runs when the app is initialized.
ApplicationIcon.png : As the name suggests , this image represents the application in the phone application list
Background.png : This is a slightly bigger image than ApplicationIcon and shows up in the Start Screen
SplashScreenImage.jpg : When you launch the application , this image gives an impression that the app is being launched. It is a good practice to design this page according to the first page of your application so that it looks like your application has loaded successfully.
MainPage.xml > MainPage.xml.cs : It is a page which has a UI and the corresponding code stored in MainPage.xml.cs.
4 : We will now explore the App.xaml file . Open App.xaml by double clicking on it . You will see the XAML code. The
As mentioned earlier - App.xaml is the entry point of an application. This means when the application is launched - App.xaml is executed first.
Now right click on App.xaml and click on "View Code". The code behind file opens up and you can see the event handlers.
Exploring the IDE a bit more :
When you click on the MainPage.xaml , you will see the XAML Designer open up . You can see the code to the right of the designer and the Windows Phone 7 UI on the left . Using the buttons ( marked in red and black ) - you can switch between XAML Code and the Designer Mode

Jet , Set and Code !
1) Go the MainPage.xaml and look out for the following line of code

This is the code for the text blocks. Change the "My Application" and "page name" in the xaml code ( Note : This can also be changed by choosing the Text Blocks and changing the Text property from the Properties window )
Switch to Design mode and you will now see the updated text.
2) Let's now shift our focus to the toolbox ( usually on the left of the Visual Studio - If not present , Click on View > Toolbox )
Drag and Drop "TextBlock" Control onto the design surface. Now drag and drop a "Button" Control.
The Design surface will now look something like this

3) We are almost there ! After you have designed the UI - you need to write the code to perform some action.
Select the Button - Go to the Properties toolbar and click on Events and Click on the dropdown button besides "Click" .
You will see immediately the code behind file opens up and the cursor lands between the button click event. Type the following code
Note : Another easy way to do this would be to double click on the button which would create the Button Click event.

Here we have instructed the textblock to display "Hello World" when the button click happens.
( Note : We have used the default names for textblock and button , but it is advised to change them to something more sensible )
Go ahead and click on the Start Debugging ( or Press F5 ) . The Windows Phone 7 Emulator will load your app.


Congratulations ! You have just designed your first Windows Phone 7 app

